This is my guide on how to make an Ethernet cable. Often just?referred?to as a network cable or patch cable. Making your own Ethernet cables will not only cut down?the price of your cables. You can also make the Ethernet cables in the?exact?length?and with the exact wiring you need. Use this guide?if you are making Ethernet cables for?personal or professional use.
First, some information about the Ethernet cables, connectors and wiring. If you are already familiar with this, you can go straight to the guide:
What is an Ethernet cable?
An Ethernet cable is a the cables used to connect devices in an Ethernet?network. The Ethernet cables are used for wired data transmission between the devices. The Ethernet is a series of standards for communication between devices like computers.
You probably know it from your own local area network. The Ethernet standards are used in most computers, both personal computers and servers. But you can also find the Ethernet standards in the automation industry. As an example of that PROFINET?the sister to PROFIBUS?uses the Ethernet over twisted pair cabling to communicate between PLC’s. Ehernet over twisted pair is what we are going to use to make an Ethernet cable.
Ethernet over twisted pair
The Ethernet networks use twisted pair cables for wired communications. Twisted pair cables are cables where the wires inside are twisted along the cable in pairs. The reason for twisting the wires in pairs are to cancel out any electrical noise or interference from outside. Also known as EMI. Network are usually vulnerable to noise. Especially when the commutation is over longer distances. Twisting the wires in pairs is done to do?differential mode transmission on the signals to equal out the noise.
There are several?types of twisted pair Ethernet cables are available. The UTP, STP and some others. They are all different and used in different environments depending on the level of electrical interference.

UTP cables
UTP means Unshielded Twised Pair. These cables are without a shield around the wires or the wire pairs. UTP cables are sometimes used for patch cables in home or office environments. But they are never used in industrial or noisy environments, because they are vulnerable to noise. Even though the wires are twisted, the signals are still vulnerable to in environments with a lot of?electrical interference.
STP?cables
STP means Shielded Twisted Pair. STP cables?is a commonly used name for all the shielded twisted pair cables. Depending on how the shielding is done in the cable, you can get several types of twisted pair cables with shield. STP refers to all the cables with either a shield or a foil to protect the signals from noise.
Besides the shield, foil is also used in twisted pair cables. Foil or?FTP (Foiled Twisted Pair) is a layer of metal foiled around either all the wires, all the pairs of wires or both.
All these types of twisted pair cables are available with different specifications. The cables are available with standed wires?or solid?core wires. Standed?wires are flexible wires. This is because the wires are divided in many smaller wires. On the other hand solid?core wires are solid wires and are not very flexible. Solid?core wires are usually used in fixed installation.
Twisted pair cable comes with different wire thickness. The usual ones are 22 and 24 AWG. If you are going to make longer Ethernet cables you should use twisted pair cables with the highest AWG number. As the cables get longer, so does the resistance. If you use thicker wires the resistance will be lower. Remember, the higher the resistance, the slower your network connection will be.
Ethernet cable categories – Cat cables
The cables used for making Ethernet cables are divided into categories. Each category is defined by the available bandwith and used for different purposes. For example category 3 or cat3 cables are used for telephone connections. All the cable categories for twisted pair cables are defined in ISO 11801.
The Ethernet cables this guide aims for are the ones using RJ45 connectors in the ends. They are the ones you can make by yourself. For that, you will be using one of the following cable categories.
Cat5 Ethernet cable
Used for short distances in LAN (100Base-Tx).
Category 5 cables or cat5 Ethernet cables are normally used in noise safe environments. They can support up to 100 Mbit/s. Since cat3 and cat4 cables are not used for Ethernet cables, cat5 is the slowest Ethernet cable you can make.
Cat5e Ethernet cable
Getting a little better with faster transmission speed (1000Base-T).
This category is a subcategory or an extension of category 5. This category has almost the same specifications as cat5, exept from some limits in for example the return loss. This makes faster network speed available. That is why cat5e cables are faster than cat5 cables.
Cat6 Ethernet cable
Now, we are there! Suitable for?up to 10GBASE-T.
Providing up to 10 Gbit/s, category 6 cables are the fastest ones.?Still no fiber connection, though. But cat6 cables are the fastest Ethernet cables you can make.
You can see a comparison of the cable categories 3 to 7, which are used for Ethernet.
RJ45 connector
The connector used for twisted pair Ethernet cables are called?RJ45 connectors. RJ45 is the common name, but they can also be referred to as?8 Position 8 Contact or 8P8C.
RJ45 is a connector with 8 pins. One for each wire in a typical Ethernet cable with 4 pairs of wires. The RJ45 connector is a one-way connector. This means that on top of the connector there is a small ?you can only connect it in one way. Here is how the RJ45 pinout looks:

When you make an Ethernet cable it is important to know where each pin # is. Because, when you connect an Ethernet cable to a RJ45 connector you will be using a crimp tool. When you have crimped the connector there is no way back. So the wires better be in the correct place, or you’ll have start over again. Make sure to have some connectors for practice.
RJ45 UTP connector
The first type of RJ45 connector you can use to make Ethernet cables are the UTP connector. As with the cables UTP simply means shielded twisted pair. This is because the UTP connectors has no shield, and are entirely made out of plastic.
The RJ45 UTP connector is the simplest one to work with, since you do not have to worry about the shield. You can use it with both shielded and shielded twisted pair cables.

The pins in a RJ45 connector are made with a sharp edge to cut into the wires, and thereby making an electrical connection.
RJ45 STP connector
The other option you have, when you are making your Ethernet cable is the RJ45 STP connector. The STP connector is made out of plastic just like the UTP connector. But the STP connector has a metal shield or metal housing around the connector.
RJ45 crimp tool
To make the electrical connection we need to?insert the wires in the RJ45 connector and press down the pins. This is done with the RJ45 crimp tool. The tool will also apply pressure to the opening of the connector, to secure the cable.

Ethernet Cable Wiring
The wiring of Ethernet cables can be done in several ways. Two of the most common ways are by following the T568A and B standards. The reason for using these standards are that the signals will run in the pairs of wires; in a way that takes advantage of the noise cancelling effect of twisted wires. Using the standards also makes it very easy to make a crossover Ethernet cable.
T568A Wiring
The first wiring standard is the T568A. It is also referred to just as A. Each wire color has its own pin number position.
Here is how the T568A wiring to a RJ45 connector looks like:

T568B Wiring
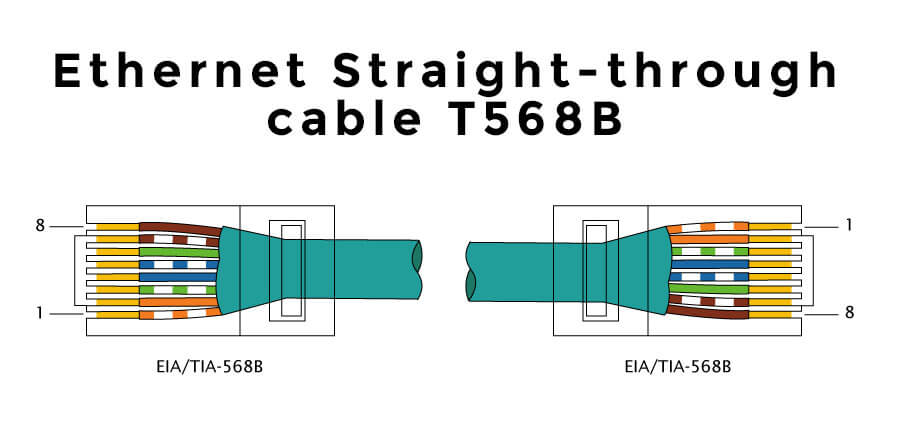
T568B is the other standard. The difference from the A standard is that the orange and green pairs are swapped. You can see the T568B wiring below:
Straight-through Ethernet cable
Ethernet cables can be made in two different ways. The first way is called straight-through and is the simplest one. Straight-through means that the cable is wired equally in both ends. The wires goes from one pin number to the same pin number.
To make a straight-through Ethernet cable you can use ether T568A or T568B. As long as you use the same standard in both ends of your cable.?If you are extending an existing network, you should always check which wire standard is used for straight-through cables and continue that. Also you should be consistent in your choice, and so using the same standard for all your cables.


Ethernet crossover cable
The second type of cable you can make is the crossover?Ethernet cable. Ethernet crossover cables are made for one special reason. Namely to swap the wires used for sending and receiving data.
For example in a RJ45 connector on a computer each pin # has a defined function. Two of the pins are for sending data, and two of the pins are for receiving data. When you want to connect two computers you are going to need an Ethernet crossover cable. Swapping the two wires for sending and receiving data in one end of the cable, will make the right connections. You will make a connection between the pins used for send in the one computer and the pins used for receiving in the other computer.
Ethernet crossover cables are used when connecting similar devices.
Similar devices has the send and receive at the same pin numbers.
The most common way to make an Ethernet crossover cable is to use T568A in one end of the cable and use T568B in the other end of the cable. This is the other reason that these standards are so useful. Because the?difference between the A and B standard is two swapped wire pairs. The exact pairs used for sending and receiving data.

The wiring diagram above shows how an Ethernet crossover cable looks like. The crossover cable are connected with the A and B standard in each end.
Ethernet cable tutorial – Step by step
The first thing to do is to strip the cable so at least 2 cm or about an inch of the wires are visible. Use a knife or a cable stripper. Be aware not to cut the isolation of the wires. In the beginning it?might be a good idea to strip a little the cable so the wires are a little longer. It?will make the next step easier.
Untwist all the wires and straighten them out. This can be done by using your fingers or nails.
Now, you have to lay out the wires in the correct color order – A or B. Place the cable between your thumb and index finger, so only the wires are visible.?Put the wires in the order you need.
While still holding the cable with the wires in the correct order, cut the length of the wires down to 13 mm.
With your other hand hold the RJ45 connector so the pin numbers align with the respective wires. Make sure that you hold the RJ45 connector the right way, so the pin numbers are aligned correct.
Insert the wires slowly into the RJ45 connector. Each wire should find its own track leading it to the pin. This can be a tricky step and you might need to repeat step 2 and 3.
Make sure that each wire is at the correct pin number.
Press the cable into the RJ45 connector until all the wires are visible at the front of the connector.
Place to RJ45 connector in the RJ45 plug on your crimp tool. When you are sure that the connector is connected, press the crimp tool. Make sure to press all the way down.
At last, make a visual inspection to see if the wires are connected and in the right order. You should also pull slightly in the connector, to see if the cable has been secured.
Remember, it can be tricky in the beginning, especially with the thick wires. But practice makes better, and eventually you will even start to enjoy making Ethernet cables.
If you enjoyed my guide on how to make an Ethernet cable or if you have any tips from your own experience, don’t hesitate to comment below or write to me.


